Your agent profile image is a simple but powerful way to personalize your communication and build trust with your leads. By adding your headshot, you create a stronger connection between your name and face across your website and emails. This helps leads feel more comfortable engaging with you and reinforces your personal brand throughout their journey.
Need to Know
-
Every user with access to the Lead Manager can upload their own profile image
-
Your profile image is managed in one place and used across your website and emails
-
It can be displayed automatically on your website when leads are assigned to you
-
You can insert it into emails using merge fields or templates
Table of Contents
Upload Your Agent Profile Image
Follow these steps to upload your agent headshot:
-
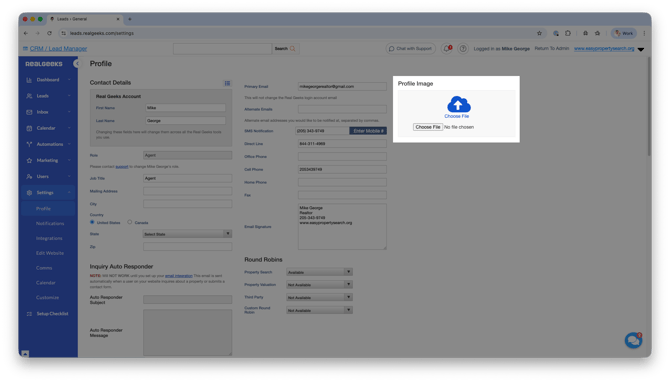
Go to your Lead Manager (leads.realgeeks.com)
-
Under Settings in the navigation menu, select Profile
-
Click Choose File
-
Select the image you want to upload
This image will be saved automatically, and will serve as your official agent profile image across the system.
Display the Assigned Agent’s Profile Image
You can automatically show the assigned agent’s photo to leads as they browse your website. This creates a more personalized experience and helps reinforce who they are working with.
By default, your website will display the site owner’s photo. Enabling this setting ensures that each lead sees the photo of the agent they are assigned to instead.
To enable this setting:
-
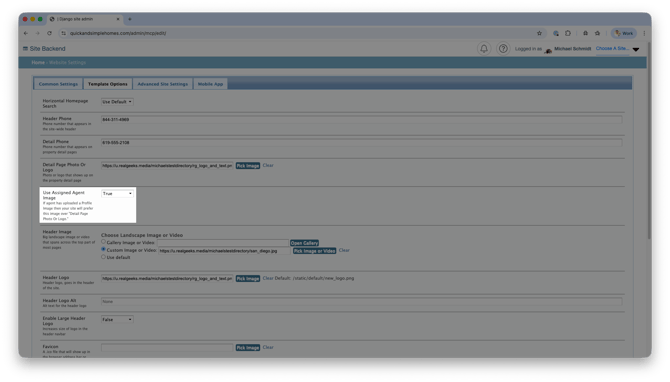
Open your website editor by adding /admin to the end of your website address (e.g. www.yourwebsite.com/admin)
-
Click Site Settings

-
Select Template Options
-
Set the Use Assigned Agent Image setting to True
-
Click Save
Once enabled, any lead assigned to you will see your photo while browsing listings on your website. This strengthens familiarity and builds trust throughout their experience.
Use The Profile Image in Emails
Your agent profile image can also be included in email communication to further personalize your outreach.
There are two ways to use your image in emails:
-
Use a merge field to automatically insert your profile image
-
Manually upload your image when composing an email
Best practice is to use email templates:
-
Create a template in the Lead Manager
-
Use the Merge Fields tool to insert the agent profile image

-
Share the template with your team
When agents use the template, their own profile image will automatically appear in the email. This makes it easy to scale personalized communication across your entire team.
Best Practices
-
Use a professional headshot that clearly shows your face
-
Keep your image consistent across your branding and marketing materials
-
Use templates to standardize personalization across your team
-
Enable the website setting to reinforce your presence beyond email
-
Combine your image with strong messaging to build trust faster
Personalization plays a key role in lead conversion. When leads can associate a real person with communication, they are more likely to respond and engage.
Frequently Asked Questions
-
What type of image should I upload?
A clear, professional headshot works best. Avoid group photos or heavily edited images. -
Will my image show for all leads automatically?
Only if the Use Assigned Agent Image setting is enabled and the lead is assigned to you. -
Can I change my image later?
Yes, you can update your profile image anytime in your Profile settings. -
Do I need to use templates to include my image in emails?
No, but templates make it much easier to ensure consistent and automatic personalization.
Need Help?
- Call us at 844-311-4969 (Mon–Fri, 8 AM–8 PM CST)
- Email support@realgeeks.com
- View our Live Events page for free coaching and training.
- Join the Real Geeks Mastermind Group on Facebook for peer tips and best practices