.svg)
Manually add leads you meet through referrals, phone calls, open houses, networking events, or other sources. This keeps their information organized and gives you access to the CRM tools you can use to follow up.
Need to Know
-
You can add a lead from the CRM App or the desktop version of the CRM
-
Add as much information as possible to give yourself helpful context for future conversations.
-
You can send the lead a personalized welcome email when creating their profile.
-
Continue learning with the Build My Database of Potential Clients Learning Path.
Table of Contents
Add a Lead to the CRM
Desktop
-
Go to leads.realgeeks.com.
-
Click New Lead.
-
Enter the lead’s basic contact information, including their name, email address, and phone number.
-
Select the lead’s Source.
-
Assign the lead to an agent.
-
Add any additional information you know, such as their Timeframe, Type, or area of interest.
-
Click Save.
CRM App
When you're on the go, add a lead quickly with the CRM App.
-
Open the CRM Mobile App
-
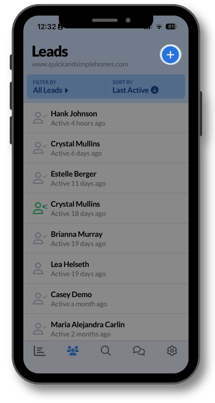
Tap the Contacts icon
-
Tap the plus (+) icon
-
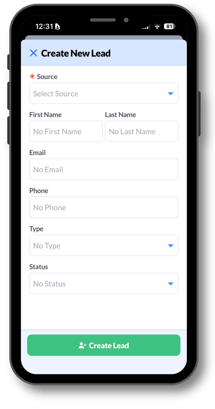
Assign a Source
-
Enter the lead’s contact details
-
Optional: Assign Type and Status
-
Tap Create Lead
Best Practices for Adding Leads
Add Helpful Background Information
Click Additional Info to enter the lead’s mailing address and other helpful details.
Add as much information as you know. This can give you the context you need to start stronger conversations and provide more personalized follow-up.
Use Notes to record important details about the lead, such as:
-
How you met them
-
What prompted their move
-
The areas or properties that interest them
-
Their preferred way to communicate
-
When they plan to buy or sell
-
Any follow-up you already promised
Send a Personalized Welcome Email
Select Send Welcome Email to send the lead an email as soon as their profile is created.
Review and personalize the message before saving the lead. Mention how you met, what they are looking for, or the next step you discussed. This makes the message feel more personal and reminds the lead why you are contacting them.
Add a Secondary Contact
Add a Secondary Contact when another person is involved in the lead’s home search or decision. This could be a spouse, business partner, family member, or friend.
Secondary Contacts receive the same property update emails sent to the primary lead. This keeps everyone informed without requiring you to create separate lead profiles or property searches.
Frequently Asked Questions
-
Do I need the lead’s email address and phone number?
Add all the contact information you have. More complete information gives you more ways to communicate with the lead. -
Can I assign the lead to another agent?
Yes. Use the agent assignment option while creating the lead to select the appropriate agent. -
Can I add more information after saving the lead?
Yes. Open the lead’s profile to add or update their information as you learn more about them. -
Does the welcome email send automatically?
The welcome email is sent when you select Send Welcome Email while creating the lead. Review the message before saving so it matches the lead’s situation.
Need Help?
-
Call us at 844-311-4969 (Mon–Fri, 8 AM–8 PM CST)
-
Email support@realgeeks.com
-
View our Live Events page for free coaching and training.
-
Join the Real Geeks Mastermind Group on Facebook for peer tips and best practices