Admin Feature
Editing the website is an account owner-level permission. If you don't see this option, contact your account owner to enable these permissions for you.
The Real Geeks text editor allows you to easily create and format content across your website. Whether you're updating a Content Page, writing a blog post, or editing text on your home page, the editor gives you simple tools to control how your content appears to visitors.
You can format text, add links and images, create lists, and adjust alignment without needing any technical or coding knowledge.
Need to Know
-
The text editor is available anywhere you edit page or blog content
-
You can format text, add links, insert images, and organize content with lists
-
Most edits can be done using the toolbar without any coding knowledge
-
The Source Code option allows advanced users to edit the HTML directly
Table of Contents
Access the Text Editor
You will see the text editor whenever you edit content on your Real Geeks website.
To access it:
-
Open your website editor by adding /admin to the end of your website address
-
Navigate to the page, blog post, or section you want to edit
The toolbar will appear above your content and provide all formatting options.
Format Your Text
The editor allows you to adjust how your text looks so important information stands out.
 Formatting options include:
-
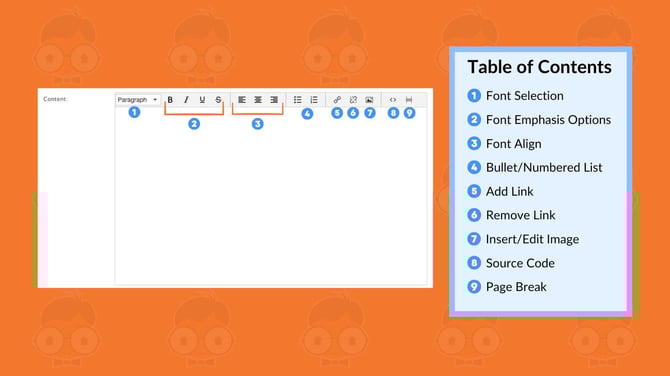
Font selection
-
Bold
-
Italic
-
Underline
-
Strikethrough
Use these options to emphasize key points, highlight important details, or improve readability for your visitors.
Align Text
You can control how text is positioned within your page using alignment tools.
 Alignment options include:
-
Left align
-
Center align
-
Right align
Most website content is left aligned for readability, while centered text is commonly used for headings or callouts.
Create Lists
Lists help organize information and make your content easier to scan.
 The editor supports two types of lists:
-
Bullet lists for general points
-
Numbered lists for step by step instructions
Select the list style from the toolbar and begin typing your list items.
Add or Remove Links
Links allow you to guide visitors to other pages on your website or to external resources.
 To add a link:
-
Highlight the text you want to link
-
Click the Add Link icon
-
Enter the destination URL
-
Click Ok
To remove a link, highlight the linked text and click the Remove Link icon.
Insert Images
Images help make your content more engaging and visually appealing.
 To insert an image:
-
Click the Insert Image icon in the toolbar
-
Browse your FileBrowser to select an image
-
Click Insert
Once added, you can adjust the image size and placement within your content.
Use Source Code
The Source Code option allows you to edit the HTML behind your content.
 This is typically used for advanced edits such as:
-
Embedding videos
-
Adding custom HTML elements
-
Adjusting layout behavior
To access source code:
-
Click the Source Code icon in the toolbar
-
Edit the HTML as needed
-
Save your changes
If you are unfamiliar with HTML, it is recommended to use the standard editing tools instead.
For more information, see our Add Custom Code to Your Website (Source Code) guide.
Add Line Breaks
Line breaks help create spacing between text elements.
 Press Enter on your keyboard to move content to the next line. This can help separate paragraphs, lists, or sections of content so your page is easier to read.
Frequently Asked Questions
-
What does the text editor do?
The text editor allows you to format and organize content on your website without needing technical skills. -
Do I need to know HTML to use the editor?
No. Most formatting and content updates can be done using the toolbar. -
When should I use Source Code?
Source Code is typically used for advanced customizations like embedding content or inserting custom HTML. -
Can I undo mistakes?
Yes. The editor includes undo and redo options so you can quickly reverse changes.
Need Help?
- Call us at 844-311-4969 (Mon–Fri, 8 AM–8 PM CST)
- Email support@realgeeks.com
- View our Live Events page for free coaching and training.
- Join the Real Geeks Mastermind Group on Facebook for peer tips and best practices