The Lead Import tool lets you quickly add multiple contacts to your Lead Manager instead of creating them one at a time. Whether you're moving from another CRM or uploading your existing network, importing contacts helps you build your database and start following up in minutes.
Need to Know
- Upload contacts using a CSV or Excel (.xlsx) file.
- Your contact information should be in their own columns in the spreadsheet you upload to Real Geeks
- Match each spreadsheet column to the correct Lead Manager field.
- Review the import results to identify any contacts that need to be corrected
Table of Contents
How to Upload Contacts
The Lead Import tool guides you through four simple steps: upload your spreadsheet, configure your import settings, match your spreadsheet columns, and review the results.
Best Practice
Before uploading your spreadsheet, remove duplicate rows and confirm your email addresses and phone numbers are accurate. A few minutes of cleanup can help prevent import errors.
Guided Demo
Click the button below to view an interactive walkthrough of this task.
Step 1: Upload Your Spreadsheet
Download Our Free Import Template
Need help formatting your spreadsheet? Click Download Template on the Bulk Import page to download our free CSV template.
 It's pre-formatted with the most common Lead Manager fields, making it easy to organize your contacts and upload them quickly.
-
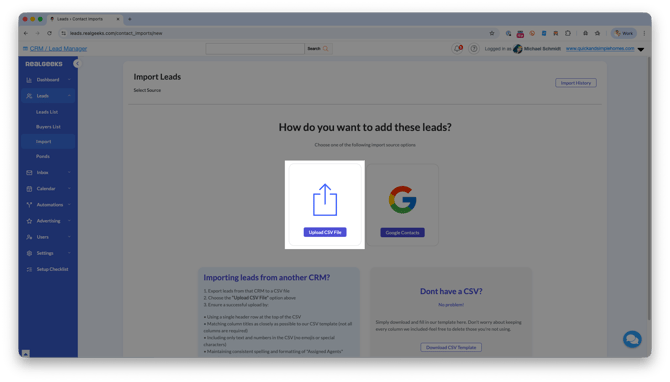
Go to leads.realgeeks.com and click New Lead
-
Click Bulk Import
-
Select Upload CSV File.
-
Click Choose File and select your CSV or Excel spreadsheet.
Step 2: Configure the Import Options
After selecting your file, you'll choose the default settings that should be applied to the contacts being imported.
 You can:
-
Assign a Source to identify where these contacts came from. If your spreadsheet already includes Source values, those will be used instead.
-
Assign an Agent to automatically assign contacts during the import. If your spreadsheet already contains assigned agents, those assignments will be preserved.
-
Assign a Lender to all imported contacts.
-
Mark Leads as New so they're easy to identify for follow-up.

-
Create Follow-Ups for Important Dates such as birthdays or home anniversaries.
-
Send a Welcome Email to introduce contacts to your website after they're imported.
When you're finished, click Next, then select Start Import.
Step 3: Match Your Spreadsheet Headers
After clicking Next, you'll match each column from your spreadsheet to the corresponding field in the Real Geeks Lead Manager.
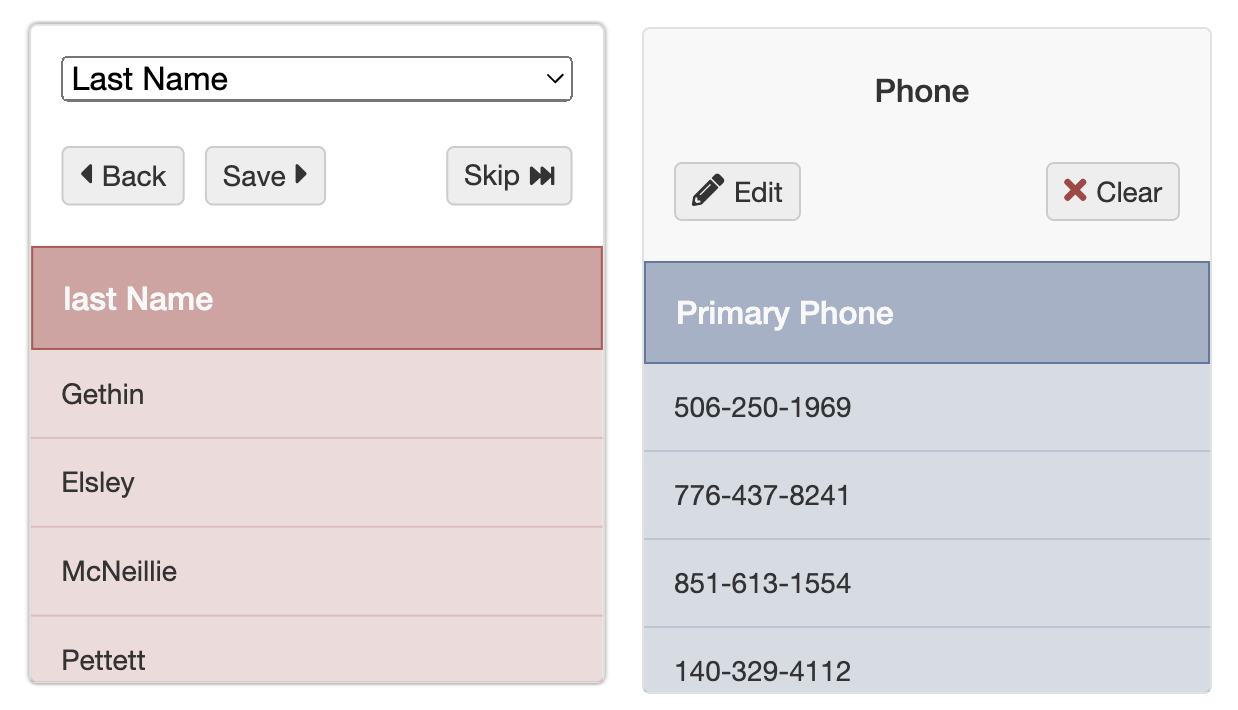
Think of this step as telling Real Geeks what information each column contains. Every column is imported only into the field you select, so review each mapping carefully before continuing.
For example:
You might match your spreadsheet columns like this:
- First Name → First Name
- Last Name → Last Name
- Email → Email
- Mobile Phone → Primary Phone
- Home Phone → Alt Phone
- Office Phone → Office Phone
- Birthday → Birthday
Best Practices for Header Matching
-
Match every spreadsheet column that contains information you want to keep.
-
We recommend mapping any Cell/Mobile Phone to the Primary Phone field. This allows you to call and send text messages through the Lead Manager.
-
Map Home Phone to the Alt Phone field and Office Phone to the Office Phone field so those numbers are also available after the import
-
Each Lead Manager field can only be matched to one spreadsheet column. If you have additional information that doesn't have a dedicated field, map it to Important Notes so it isn't lost during the import.
When you've finished matching your columns:
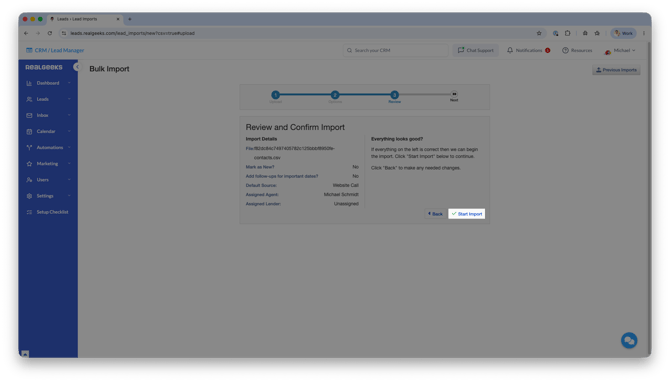
- Click Review Changes.
- Click Start Import.
Step 4: Review the Import Results
After the import finishes, review the Results page to confirm your contacts were imported successfully.
If any contacts could not be imported, download the error report to see exactly what needs to be corrected before importing those contacts again.
Best Practices
"I Don't Have a Database"
Many new agents think they don't have anyone to upload. In reality, you probably already know more potential contacts than you realize.
Consider importing:
-
Friends and family
-
Past clients
-
Referral partners
-
Contacts from previous jobs
-
Networking and community connections
-
Vendors and local business owners
-
Open house visitors
-
Internet leads from another CRM
Every contact is an opportunity to grow your business. Someone may become a future client, refer a friend, or stay connected to your website until they're ready to buy or sell.
Activate Your Database
Importing contacts is only the first step. Once they're in your Lead Manager, give them a reason to stay engaged.
We recommend:
-
Update their Status, Timeframe, and Urgency.
-
Reach out to your highest-priority contacts first.
Troubleshooting
If contacts fail to import, download the Results file to see why each contact was rejected.
"User with role 'Agent' not found"
- The assigned agent is not a User in your Lead Manager.
- Add the agent as a User, then upload the contacts again.
"Phone is too short (minimum is 8 characters)"
- The phone number contains fewer than eight digits.
- Remove special characters or hidden spaces if necessary.
"Please enter a valid Email"
- The email address is not formatted correctly.
- Correct the email address before importing again.
"A lead with that Email already exists"
- A contact with this email address already exists in your Lead Manager.
- Duplicate contacts are automatically skipped during import.
Frequently Asked Questions
-
What file types can I upload?
CSV and Excel (.xlsx) files are supported.
-
Can I import contacts without email addresses?
Yes. However, email addresses are used to help prevent duplicate contacts.
-
Will duplicate contacts be imported?
No. If a contact with the same email address already exists in your Lead Manager, it will be skipped.
-
Can I assign contacts while importing them?
Yes. You can assign a Source, Agent, and Lender during the import process.
Need Help?
-
Call us at 844-311-4969 (Mon–Fri, 8 AM–8 PM CST)
-
Email support@realgeeks.com
-
View our Live Events page for free coaching and training.
-
Join the Real Geeks Mastermind Group on Facebook for peer tips and best practices
Related Articles
-
Lead Import - Prepare Your Contacts for Upload to Real Geeks