.png?width=500&height=146&name=Real%20Geeks%20Primary%20Logo%20Black%20(3).png)
An image at the top of your website is the large visual that appears at the top of your site and key pages. While it does help your site look polished, its real value is helping visitors quickly understand your market. Using local landmarks, neighborhoods, and familiar scenery makes your site feel more relatable and gives buyers and sellers a clearer picture of the area you serve.
Need to Know
-
Images at the top of your website appear at the top of your website and pages
-
You can use one image site-wide or different images on individual pages
-
Images automatically adjust to fit desktop and mobile screens
-
Choosing the right image helps avoid awkward cropping or blurry visuals
Table of Contents
How Your Website’s Top Image Impacts Visitors
Your image at the top of your website sets the tone for your entire website. Clean, relevant visuals make your site feel modern and intentional, while poorly chosen images can feel distracting or unprofessional.
Best practice is to choose images that represent your market and brand without relying on text or tight framing. Simple visuals tend to display better across devices and screen sizes.
Recommended Image Types
The following image styles work especially well for images at the top of your website:
-
Local landmarks
-
Neighborhood scenes
-
City skylines
-
Landscapes
-
Luxury homes
-
Seasonal imagery
-
Aerial views
If you need high-quality images, free stock photo libraries like Unsplash.com or Pexels.com are great options for website-safe visuals. Just download and add to Real Geeks!
Image Requirements and Sizes
Before uploading an image for the top of your website, make sure it meets these basic requirements for the best results.
File formats
-
JPG
-
PNG
Recommended dimensions (by website template)
-
Anna: 2200 × 600 px
-
Anna-Modern: 2560 × 1440 px
-
Miranda: 2200 × 720 px
-
Miranda Thin: 2200 × 550 px
-
Molly: 1100 × 720 px
Best practices for image selection
-
Avoid images with text or faces that could be cropped
-
Keep visuals simple and uncluttered
-
Choose imagery that matches your branding and market. Focus on Landscape or local
-
Preview images on both desktop and mobile to make sure that your image isn't cropped or looks wrong/incorrect
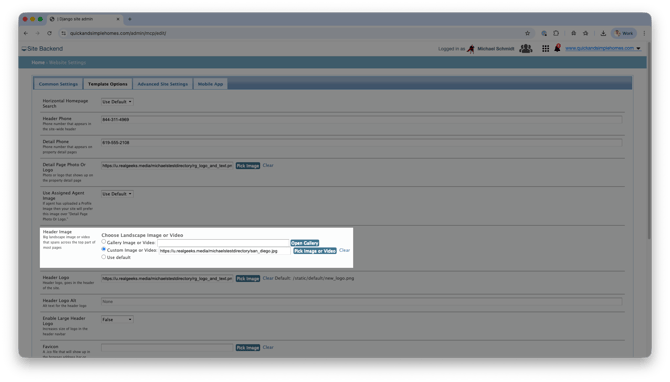
How to Set a Site-Wide Image at the Top of Your Website
Setting a site-wide image at the top of your website applies the same image across your entire website. This is ideal if you want a consistent, branded look on every page.
Step-by-Step Instructions
-
Open your website editor by adding /admin to the end of your website address (e.g. www.yourwebsite.com/admin)
-
Click Website Settings

-
Select Template Options
-
Under Header Image, choose one of the following options:
-
Click Open Gallery to select a free gallery image
-
-
-
Click Pick Image or Video to upload a custom image
-
Click Insert to apply the image
-
-
-
Click Insert to apply the image
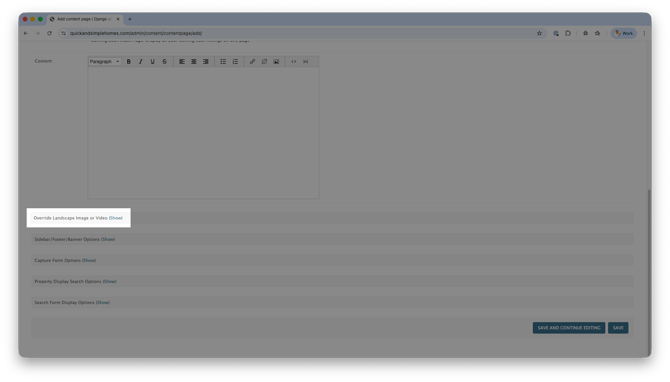
How to Add an Image at the Top of Individual Pages
Images at the top of individual pages are managed on a page-by-page basis. Every time you build or edit a page in Real Geeks, you have the option to personalize the primary image shown at the top.
In your website settings, this option is called Override Landscape Image.
Step-by-Step Instructions
-
Open your website editor by adding /admin to the end of your website address (e.g. www.yourwebsite.com/admin)
-
Open the page type you want to edit, such as a content page or area page
-
Click Show next to Override Landscape Image or Video
-
Choose one of the following options:
-
Click Open Gallery to select a free gallery image
-
Click Pick Image or Video to upload a custom image
-
Click Insert to apply the image
-
-
-
Click Save
Need Help?
-
Call us at 844-311-4969 (Mon–Fri, 8 AM–8 PM CST)
-
Email support@realgeeks.com
-
Visit Real Geeks University for free video courses
-
Join the Real Geeks Mastermind Group on Facebook for peer tips and best practices