Content Pages 

Follow


Overview

Content Pages are available to display custom resources,  and share information with website visitors.

Use these pages to "educate and entertain" potential leads, and keep your current leads engaged on the website with compelling content!


Create a Content Page

Page Fields (Parent, Title, etc...)

Improve SEO and identify your page internally with our basic page fields. Review the breakdown of the options available (below) to help you customize your page:


Parent
Optional. Select from a list of previously made pages to develop a URL hierarchy to better organize the pages on your website.

Parent Example

Goal: Create a page for a small neighborhood in San Diego, called Hillcrest.

Process: Use the dropdown menu for Parent to select the previously-built, San Diego page. 

Result: The parent of www.easypropertysearch.org/san-diego/hillcrest/ is now san-diego. 

Area Name
Enter the name of your target location
Title
Develop a short, descriptive, title to identify your page
Title Example: New Properties for Sale in San DiegoMeet the Real Estate Team, Sell with Confidence

Title Example

New Properties for Sale in San DiegoMeet the Real Estate Team, Sell with Confidence, etc...

Meta Description
1-2 sentence summary of your page's content. This is the "subtitle" for your page, and appears in Search Engine results.
Meta Keywords
Leverage a combination of key words or phrases that describe the content of your page. 
Use commas to separate each word/phrase
Anchor Text
Used internally to find your page in the Website Backend
Slug
The lower-cased text that appears behind the ".com" of a website. This is used to identify a single page on a website.

Slug Example

The slug for www.easypropertysearch.org/buying is buying


Add Content

Add custom content to the page in order to entice lead activity. This gives you a chance to "sell" this market to potential clients. 

This space allows you to add videos to your website, share images, share local resources, or share your expertise of the market in one convenient location. 


Override Landscape Image

Personalize your page with a unique image or video. 

Feature a photo of a property from the area, or display local wildlife/nature to set the tone of your market. 

Learn More

  Please Note

This will replace the default Header Image that is displayed site-wide. This "default" image can be adjusted in your website Site Settings. 

While Editing your page, scroll down to Override Landscape Image or Video, and click Show


    1. Choose Landscape Image or Video: Select a custom image or video to be displayed as the backdrop for your page.
      • Gallery Image or Video: Select from Real Geeks' image and video library
      • Custom Image or Video: Select a custom image or video 
      • Hide Landscape Section: Remove the video/image from the background
      • Use Default: Uses the default photo for the website as the background image. Learn how to establish this here.
    2. Optional: Enter 1-2 relevant keywords in the Landscape Image Override Alt Text.
      You can learn more regarding the importance of Alt Text here.
    3. Click Save at the bottom of the page to save your changes.

Real Geeks Recommendations:

  • Learn about our image size requirements here.
  • Avoid using images with text or people on them. These videos or images could appear differently on your client's different devices. 
  • Use websites such as www.pexels.com or www.unsplash.com to search and download high-quality images for free to feature on your website.


Property Display Search Options

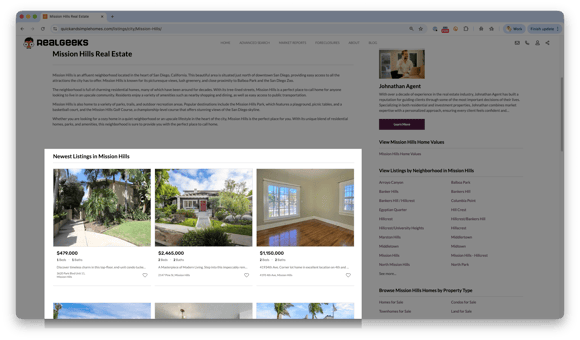
Add listings to your page to promote lead sign up and exploration.

Use this resource to promote you and your team's listings here, or advertise properties based on location, number of beds/baths, or additional features such as Waterfront, pools, square footage, etc...

Learn More
  1. While Editing your page, scroll down to Property Display Search Options, and click Show

    1. Write a Title that will appear above your listings in the Listing Header field. This title should help leads identify more information about the listings
    2. Establish how many results to display on your page at a time

      Please Note

      10-15 is the recommended number of properties to show at a time. 

    3. Place your leads Above or Below your page's content 
    4. Click Create Search to build a search using criteria that will display listings on your page.
      1. Enter your target property search criteria (city, beds/baths, style, etc...)
      2. Sort properties by price or listing date with the Sort By menu
      3. Select Create Search to Review the available properties that match your selected criteria, then confirm by clicking Yes
    5. Click Save at the bottom of the page to save your changes.


Sidebar/Footer/Banner

Sidebar

This is located on the right-side of your website, and is used to share unique resources that are relevant to your page's content. 

Unique sidebars can be added to specific pages, helping you promote more exlusive information that is not found anywhere else on your website! 

Here are some common examples of what many agents share on their websites:

  • Share relevant information about a specific market - "Properties for sale in San Diego under $400k"
  • Advertise local businesses - "Check out Roger's Burger Stand
  • Highlight local attractions/things to do in the area - "Learn more about the local swimming hole!"
  • Promote your personal resources, such as a Sellers/Buying Guide for clients to reference in their real estate journey - "Download our free Buying Guide" 

See below to learn how to add a new sidebar to your Real Geeks webpage

Learn More

While Editing your page, scroll down to Sidebar/Footer/Banner, and click Show


Create a New Sidebar

  1. click the green + sign. A new window will open to create a new Sidebar
    • For Images/Videos/Custom Codes: choose Custom Content
    • To Create a List of Pages/Links: Choose Link List (1 column or 2 column)
    • To Share your Recent Blog posts: Choose Recent Blog Posts 
    • Example:Search Popular Areas, View Popular Attractions in San Diego, Things to do in San Diego, etc...
    • Name: enter a descriptive, recognizable, name to help finding your sidebar later
    • Item Type: Select how your content will be displayed
    • Header: Give context to your resources with a "title"
    • Add Link: Only available with Link Lists, this let's you add more links to that section of the sidebar
  2. Click Add Another Sidebar Item to add more content to your sidebar
  3. Click Save

Choose Sidebar

  1. Select the dropdown menu next to Custom Sidebar
  2. Select your Sidebar by Name
  3. Click Save

Edit Sidebar

  1. Select your custom Sidebar in the dropdown menu
  2. Click the pencil icon to adjust your changes
  3. After all adjustments have been made, click Save

Footer

Located at the bottom of the website, this space is perfect for sharing your team's contact information. 

This is the ideal location for any required information that must be displayed on your website (MLS board, Brokerage, etc...) because this area can be displayed on every page. 

See below to learn how to update your footer on a specific page!

Learn More

While Editing your page, scroll down to Sidebar/Footer/Banner, and click Show


Create a New Footer

  1. click the green + sign. A new window will open to create a new Footer
  2. Use the provided space to enter your custom content
  3. Click Save

Choose Footer

  1. Select the dropdown menu next to Custom Sidebar
  2. Select your sidebar by Name
  3. Click Save

Edit Footer

  1. Select your custom Footer in the dropdown menu
  2. Click the pencil icon to adjust your changes
  3. After all adjustments have been made, click Save

Banner

Make page-specific announcements to engage more of your contacts. 

Example: Announce your latest open house, unveil a new listing available on the market, or advertise additional details to any traffic that hits your page. 

See below to discover how to create a banner for a specific page!

Learn More

While Editing your page, scroll down to Sidebar/Footer/Banner, and click Show


Create a New Banner

  1. click the green + sign. A new window will open to create your banner
    • Name: enter a descriptive, recognizable, name to help finding your banner later
    • Message: Enter your message to clients. This message can only be 150 characters long
    • URL: Add the link to your target page. Example: Search for your listing on the website, then share the link to your listing
    • Call to Action: Customize the text that appears on the banner's button. Examples: Learn More, Click Here, Get Started, etc...
  2. Click Save

Choose Banner

  1. Select the dropdown menu next to Custom Banner
  2. Select your banner by Name
  3. Click Save

Edit Banner

  1. Select your custom banner in the dropdown menu
  2. Click the pencil icon to adjust your changes
  3. After all adjustments have been made, click Save


Capture Form Options

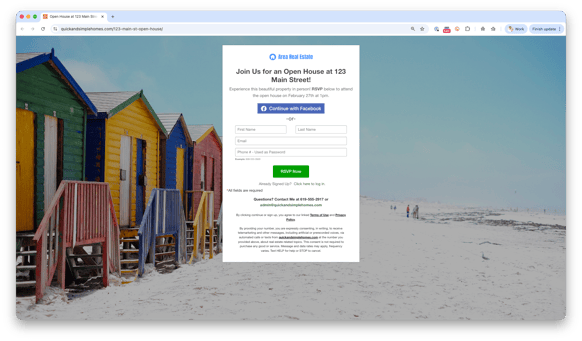
Convert any custom page into a lead-generating Landing Page. This means the lead would be required to sign up before viewing the contents of your page. 

Many agents use this feature to share Agent resources (Buying/Selling guides for users, Market breakdowns, custom videos, special information, etc...) and utilize this to generate leads. 

This capture form can be customized to display custom images and text to assist you in promoting the content behind your capture form. 

Learn More

While Editing your page, scroll down to Capture Form Options, and click Show


Create a New Capture Form

  1. click the green + sign. A new window will open to create a new Sidebar
    • Name: enter a descriptive, recognizable, name to help finding your custom Capture Form later
    • Source: Select an exisiting source in your CRM to assign towards your leads after signing up while using this form
    • Source Override: Create a custom source to assign towards your leads after signing up while using this form
    • Logo: Upload a custom logo to be displayed on your capture form
    • Title: Custom text that will appear at the top of your capture form
    • Text: Space to personalize your capture form. This can be used to provide context for your page, or promote leads to sign up 
    •  Enable Facebook Login: Allow users to login using their Facebook contact information (First/Last Name and Email Address)
    • Capture Form Fields: Add or remove certain required fields on your capture form
    • Button Text: Text that appears on the form's Submit button
    • Footer: Text that appears at the bottom of your capture form
    • Choose a Background Image: Image that is to be displayed behind your capture form. This can be personalized with a Custom Image (Click Pick Image next to the Upload Custom Image choice, or one of our free Gallery Images)
  2. Place a checkmark in the Require Capture in order to activate the capture form
  3. Click the Lead Capture Search to generate a custom Saved Search that will be assigned to your lead after sign up. This means they will begin receiving automated updates about properties in a specific market.
    1. Enter your target property search criteria (city, beds/baths, style, etc...)
    2. Sort properties by price or listing date with the Sort By menu
    3. Select Create Search to Review the available properties that match your selected criteria, then confirm by clicking Yes
  4. Send Autoresponder: Deliver the website's default welcome email. Learn more about this email here. 
  5. Click Save

Choose a Capture Form

  1. Select the dropdown menu next to Capture Form
  2. Select your Capture Form by Name
  3. Click Save

Edit Sidebar

  1. Select your Capture Form in the dropdown menu
  2. Click the pencil icon to adjust your changes
  3. After all adjustments have been made, click Save


Search Form Display Options

Adjust your page's quick search, or change the white Title text above your page's search tool.

Learn More

While Editing your page, scroll down to Search Form Display Options, and click Show


Update Your Quick Search

  1. Search Header: Customize the text that appears above your page's quick search
  2. Search Form Type: Only available when using the Miranda, Miranda-Thin, or Molly website templates, this lets you adjust the page's quick search format
    • Default Search Form: sleads would use dropdown menus to specify location and price to see available listings
    • TypeAhead Search: leads would manually type search location to see available listings
  3. Set Search Defaults: Select the default search options that appear on your page's quick search. This is only available when using the Miranda, Miranda-Thin, or Molly website templates
  4. Click Save

rg playbook placement.jpg

Was this article helpful?
0 out of 0 found this helpful